Painting canvases and having sweet treats to match is a great way to create a crafty get together, celebration or party. These three kid canvas paintings are great for the summertime because gosh, we all love sweet treats when the weather gets hot and sticky. I am excited to provide you with the steps to lead a group of kiddos as they create masterpiece canvases. I am also thrilled to share the recipes for the coordinating concoctions that you can either make and serve at your gathering or have the kids make with you. This post is sponsored by DecoArt but the ideas and opinions are my own. DecoArt makes awesome acrylic paints that work great with kiddos because they are creamy and don’t get runny. The Americana brand is my favorite so that is what I used on all of these.

Before you start painting with kids, here are some tips!
- Use Americana paints and quality canvas.
- Have the kids wear old clothes or art smocks.
- Have a palette (or plate) for paints for each kid.
- Be sure to have enough brushes so the kids don’t have to be washing between every color.
- Have paper towels on the table AND cups of water for used brushes so they don’t get ruined.
- Add paint colors to the palette as needed. Don’t start with all of them already out and accessible.
Let’s start with the watermelon.

Here are the steps to painting the canvas in picture format.
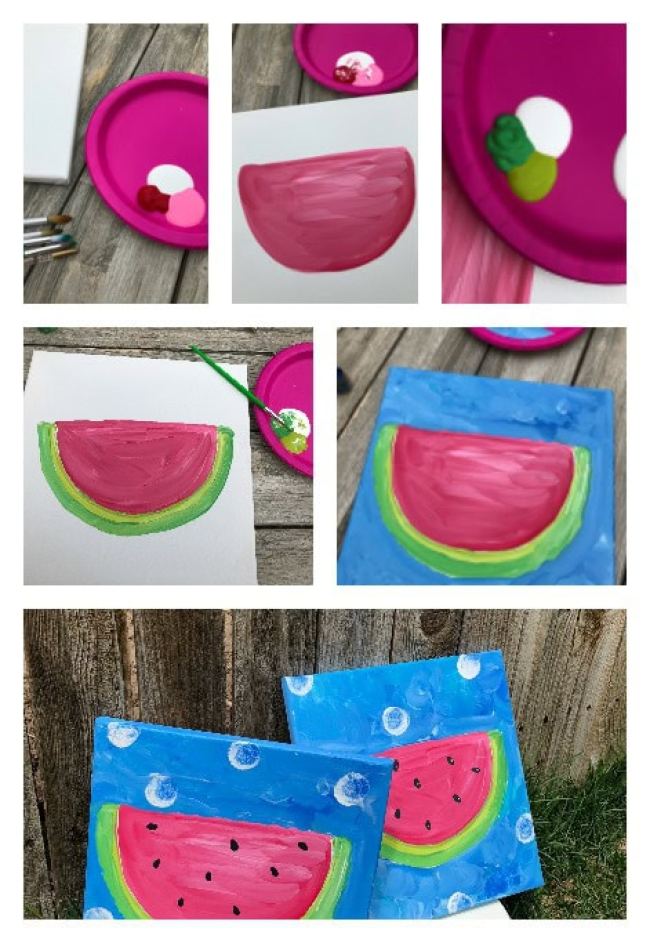
- Start by mixing pink, red and white to make the inside of the melon.
- Change brushes and mix a light and dark green with white to get the rind. Be careful not to mix with the inside of the melon.
- Change brushes. Mix a light blue with a dark blue and white to paint the surrounding areas.
- By now, your inside should be dry. Add watermelon seeds with black using a small brush.
- Add dots to the blue background with either a round sponge brush or painting. Use your blue mix emphasizing the white.
- Let the canvases dry while you have your concoction treat then have the kids sign their work with a permanent marker.
A close up photo might help show how the mixing of paints goes. It is a dip in each color before applying to the canvas, not a stir it all into a new color kind of thing.

The watermelon spritzer is super yummy. You will need the following for each drink.
- Tall Clear Cup or Jar
- Straw for Stirring
- Cubed Watermelon Pieces (approx. 1 inch x 1 inch x 1 inch) – 3-4 per drink – BEST FROZEN
- 1 TBSP Sugar per Drink
- 1 C Lemonade per Drink
- ½ C Seltzer Water per Drink
Directions:
- Put watermelon in cup/jar first.
- Add sugar and stir around to get sugar on the watermelon pieces.
- Pour in lemonade.
- Pour in seltzer water.
- Mix and drink.
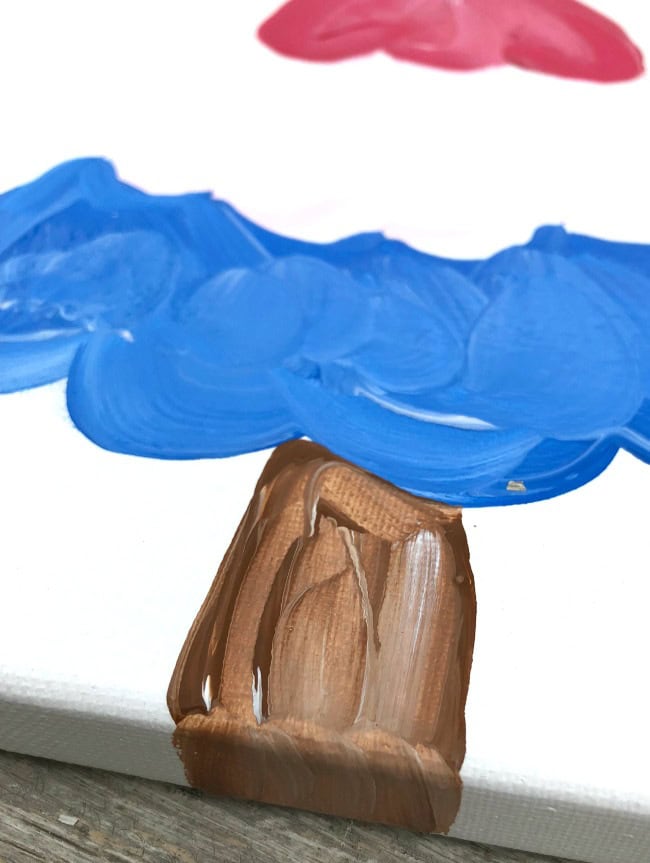
Next up is the popsicle (aka bomb pop).

I love this one for patriotic celebrations, either as the decoration or the activity. Again, I am going to start by sharing the photos of the painting steps.

- Start by mixing red with white paint for the top of the popsicle.
- Paint the white center. To get it to show up a little darker and with some contrast, add a tiny bit of the red mix.
- Mix dark blue with white to paint the bottom layer of the popsicle.
- Use a clean brush to mix brown and white for the stick.
- Mix a dark yellow with white and paint stars in the background.
- Mix in a light yellow to the dark yellow and white to paint the background.
Here is a close up to show the way the paint mixes. If you want it to be extra white-washed, add white as you go.
The bomb pop drink is like a science experiment. You will need the following ingredients for each drink.
- Clear Cup or Jar
- Straw for Stirring
- Grenadine (3 TBSP per Drink)
- Sobe Pina Colada Drink (1/2 C per Drink)
- Blue Gatorade (1 C per Drink)
- ICE
Directions:
- Put ice in glass first.
- Add Grenadine and let settle.
- Add Sobe and let settle.
- Add blue Gatorade and let settle.
The highest sugar content (grenadine) stays on the bottom. Pretty cool, huh?
The third canvas is an ice cream cone!

Here are the photographed painting steps.
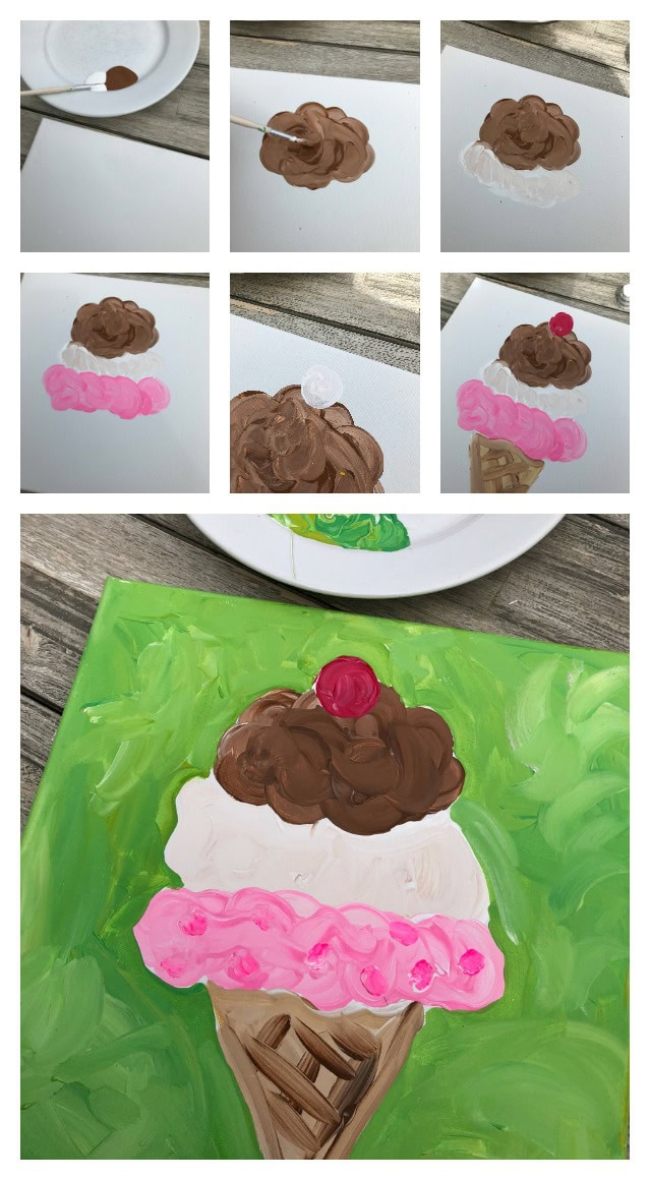
- Start with the chocolate scoop on top by mixing brown and white paint.
- Use a clean brush to add a vanilla scoop under the chocolate. To get contrast and texture, add a TINY bit of the brown mix.
- Add a strawberry scoop by mixing light pink with white using a new brush.
- Paint the ice cream cone with the brown and white mix. Add brown accents by using more brown than white.
- Use white paint to paint a circle for a cherry overlapping the chocolate scoop. Then add red paint. If desired, add a black stem.
- Paint the background with a mix of light green, dark green and white.
- Add dark pink dots to the strawberry.
- Add black dots to the vanilla if you want it to look like chocolate chip.
Here is a close up of the paints as they mix. Reminder, don’t mix them on the palette. Dip your brush in each color and do the mixing as you paint.

The treat for this masterpiece is an ice cream cone with sprinkles!
These are the colors of Americana paint you will need to complete all of these canvas designs.
- Red Alert
- Bubblegum Pink
- Snow
- Ebony
- Blue Harbor
- Ultramarine
- Sour Apple
- Festive Green
- Red Alert
- Ultramarine
- Milk Chocolate
- Lemon Yellow
- Golden Straw
- Snow
- Milk Chocolate
- Bubblegum Pink
- Peony Pink
- Snow
- Sour Apple
- Festive Green


